Getting Started

SaviScript is an easy-to-use, constantly improving scripting and programming language used to control robots from Relay Robotics. All current robots are on RelayCore, which supports SaviScript programs. The language was created so various target users can easily control the robots, from internal technicians to hotel staff to even students learning how to program!
In order to queue SaviScript commands, you must have access to Robot Control. To create and edit programs, you must have access to Program Editor.
If you do not have access to the required apps, please let your administrator know.
Tutorial: Full Delivery
To create a full program that is a stripped-down version of a delivery process, we will now go through the steps of going to the pickup location, going to the drop-off location, then returning to the dock, while displaying on-screen communication with the user about what the robot is currently doing.
Below is a flowchart of the process that the program will go through:
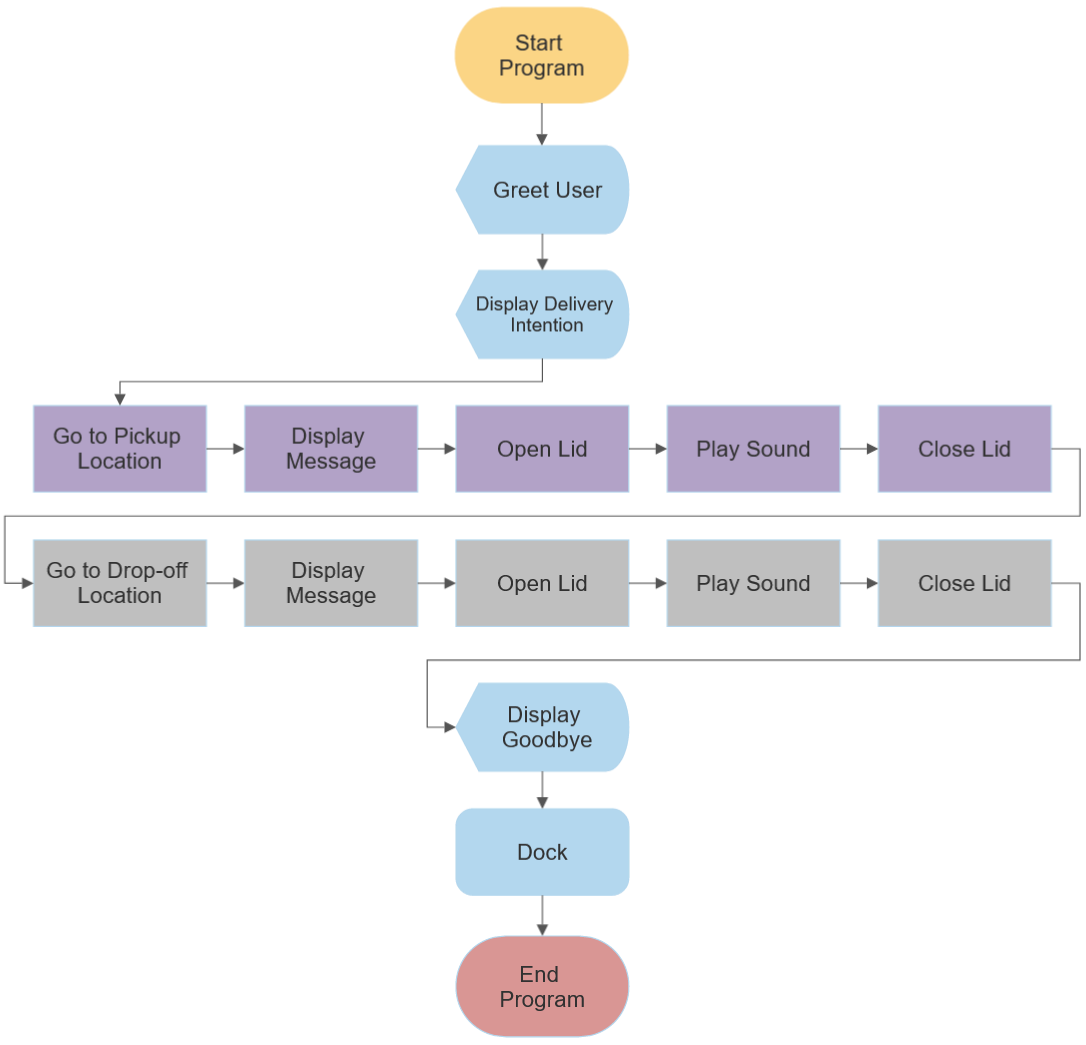
The robot will go through this step-by-step process from start to finish. While there are many nodes in this flowchart, don't fret - nearly all of these actions are one-line commands. Ready to get started on this program? Let's go!
Update here
Step 1: Start with DISPLAY commands
In the Program Editor, let's create a new program named "Full Delivery". Make sure the namespace, or the parent folder it is located in, is just under Programs, not any of the sub-folders.
In the first line of code, we will start with three DISPLAY commands with SLEEP following each. Let's greet the user, then let them know what the robot is doing:
DISPLAY "Hello there!"
SLEEP 3
DISPLAY "Let's make a delivery."
SLEEP 3
DISPLAY "Navigating to the Pickup Location..."
SLEEP 3
Now, make a quick description of your first program save (so you and others will know what changes you made!), then click Save.
Run the program. Did the robot do what you expected? If the robot did not display three different messages with three-second pauses, check the program's syntax and make sure the robot is being properly communicated with the Cloud server.
Step 2: Go to the Pickup Location
The robot has successfully announced its intention to go deliver - great! Now, let's have it move to our first destination.
Each robot is connected to your building's specific navigation map. Each map has unique, marked locations. There can be multiple pickup or drop-off locations. Identify one of these pickup locations by name, and let's have the robot move there using the GOTO command. Edit the "Full Delivery" program by adding the following lines of code after the code from Step 1:
GOTO "PickupLocation"
SLEEP 5
DOCK
The PickupLocation argument will change based on the location names of your navigation map.
This section of code will command the robot to navigate to the specified location, wait five seconds, then navigate back to its designated dock.
Let's make sure this command works properly before progressing. Write in a quick change description, click Save, then run the program. Did the robot move? If it returned an error, double check that your location is a valid point on the navigation map.
If everything worked properly, let's finish all of the actions we planned out during pickup.